Solana (SOL) has been trading within a defined accumulation range. We are currently sitting in the middle "no-trade zone," waiting for a decisive move.
Smart money often hunts for liquidity before the real move begins. We have identified a High Time Frame (HTF) Sweep Zone & Order Block (Green Box) below us, and a breakout level above us.
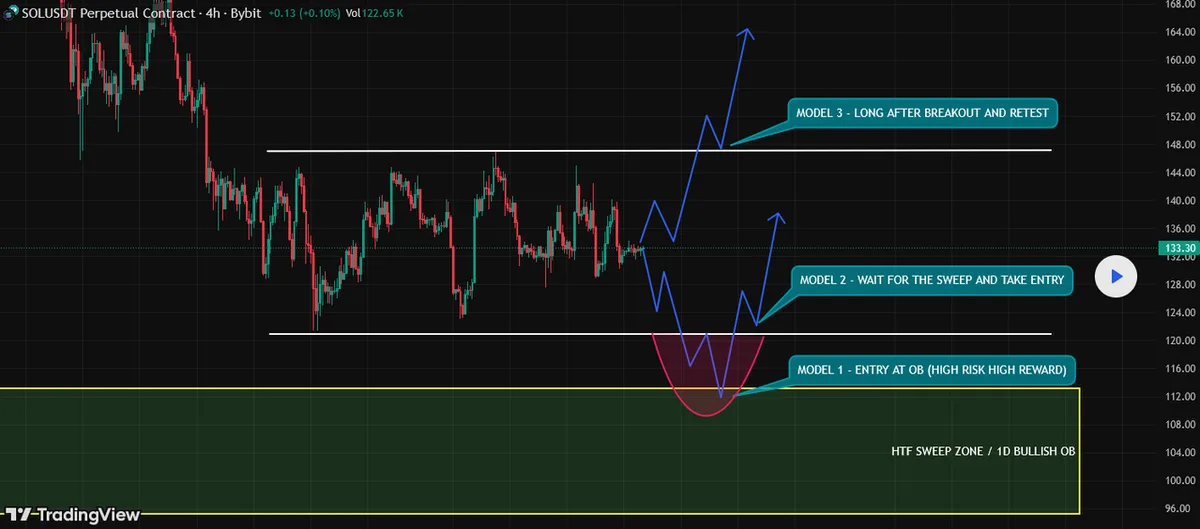
Here are the 3 SPECIFIC MODELS to trade this setup, depending on your risk tolerance:
MODEL 1: ENTRY AT OB (HIGH RISK, HIGH REWARD) The Sniper Approach
This is the aggressive entry for traders who want the best possible price.
The Plan: Set limit orders directly inside the HTF Sweep Zone / Bullish Order Block (Green Box)
The Logic: You are "catching the knife" based on strong institutional demand in this area.
Risk: Price could continue lower. This model requires a strict Stop Loss but offers the massive Risk-to-Reward (R:R) potential.
MODEL 2: WAIT FOR THE SWEEP & TAKE ENTRY (CONSERVATIVE) The Confirmation Approach
This is the safer alternative to Model 1.
The Plan: Let the price drop into the Green Box to sweep liquidity. Do not buy yet.
The Trigger: Wait for the price to pump back up and close a 4H candle back inside the range (reclaiming the support level).
Entry: Enter on the close of that reclamation candle.
Logic: This confirms that the dip was just a "bear trap" and buyers have stepped back in.
MODEL 3: LONG AFTER BREAKOUT & RETEST (CONTINUATION) The Momentum Approach
This model plays the breakout of the upper resistance (White Line, ~$148).
The Plan: Wait for price to break clearly above the resistance.
The Trigger: Wait for a SUCCESSFUL RETEST. Price must come down, touch the old resistance, turn it into support, and bounce.
Entry: Long the bounce after the retest holds.
CRITICAL WARNING: THE "TOP LIQUIDITY SWEEP" TRAP Do not get trapped here.
Model 3 has a specific danger: The Fakeout. If price breaks above the resistance but FAILS to hold the retest (i.e., it crashes back down into the range), this was NOT a breakout. It was a Top Liquidity Sweep (a trap to catch early longs).
Rule: If the retest fails, Model 3 is invalid. Do not FOMO long at the highs without confirmation.
SUMMARY
Aggressive? Use Model 1 in the Green Box.
Conservative? Use Model 2 and wait for the reclaim.
Momentum? Use Model 3 but ONLY if the retest holds.
Disclaimer: This analysis is for educational purposes only. Cryptocurrency trading involves high risk. Always manage your risk properly.